PrevIndexNext
Introduction to Perl/Tk
Tk is a module that extends Perl.
It permits a Perl program to have a graphical interface
very similar to what one could achieve with the Visual C++
or Java Swing graphical user interfaces (GUI). Here is 'hello.pl',
the simplest of Tk programs:
use Tk;
my $mw = MainWindow->new;
MainLoop;
In order to make this work the Tk module must first be installed.
See the previous section for a general discussion of how to
install modules with PPM.
C:> ppm
PPM> install Tk
Install package 'Tk?' (y/N): y
...
...
PPM> quit
Installing a module also installs the documentation for that module.
Click here
to see the main page for Perl documentation. Scroll down on the left
hand side until you see Tk in the Libraries section.
If you intend to use Tk a lot it makes sense to get a book on the
subject. There is the definitive and excellent one from O'Reilly:
Click on the book above to buy it from O'Reilly.
With Tk installed, we can now invoke the program 'hello.pl'
and this is what appears:
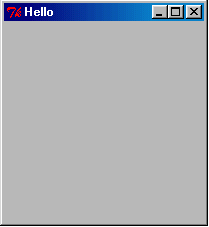
Cool, huh?!
Now we can start embellishing. Changes are marked in green.
use Tk;
my $mw = MainWindow->new(
-title => "Simple Tk Program",
-background => "red",
);
MainLoop;
which makes the background red and puts a better
title in the title bar:
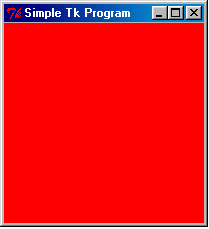
Tk provides many 'widgets' - user interface elements like
buttons, checkboxes, scrollbars, menus, drawing areas, sliders,
text areas, etc. To demonstrate how these are created and configured
we will make a Button with the text "Push Me!"; it will have a blue
background. One critical step is to 'pack' it into the main window.
use Tk;
my $mw = MainWindow->new(
-title => "Simple Tk Program",
-background => "red",
);
my $button = $mw->Button(
-text => "Push Me!",
-bg => "blue",
);
$button->pack;
MainLoop;
Look what happens to the window:

We can keep the window from collapsing around the
button with this:
use Tk;
my $mw = MainWindow->new(
-title => "Simple Tk Program",
-background => "red",
);
$mw->minsize(300, 400);
my $button = $mw->Button(
-text => "Push Me!",
-bg => "blue",
);
$button->pack;
MainLoop;
And we get this:
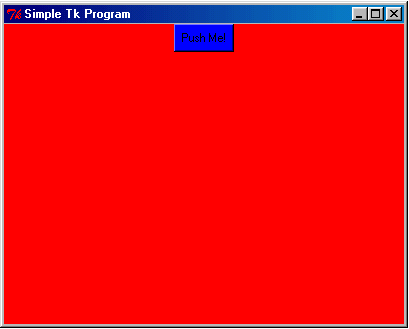
The button does not do anything at all but you can push it!
To make it do something - like printing 'hello there', we do this:
use Tk;
my $mw = MainWindow->new(
-title => "Simple Tk Program",
-background => "red",
);
$mw->minsize(400, 300);
sub hello {
print "hello there\n";
}
my $button = $mw->Button(
-text => "Push Me!",
-bg => "blue",
-command => \&hello,
);
$button->pack;
MainLoop;
The syntax "\&hello" will cause the
subroutine 'hello' to be executed each time the button is pushed.
The string "hello there" will appear in the DOS window (which was
iconified automatically). Within the subroutine 'hello' you can
do whatever you wish - including exiting the program, making other
buttons, changing colors, writing files; the full power of Perl
is at your disposal. Here are some further enhancements:
use Tk;
my $mw = MainWindow->new(
-title => "Simple Tk Program",
-background => "red",
);
$mw->minsize(400, 300);
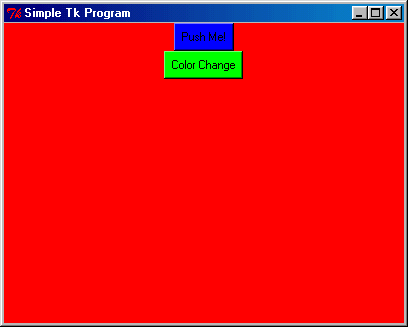
my $button = $mw->Button(
-text => "Push Me!",
-bg => "blue",
-command => sub {
print "hello there\n";
},
);
$button->pack;
sub change_color {
$button->configure(
-background => "yellow",
);
}
$mw->Button(
-text => "Color Change",
-bg => "green",
-activebackground => "orange",
-command => \&change_color,
)->pack;
MainLoop;
This demonstrates three things:
- If a subroutine is very short, you can put the body of it
after the word 'sub' directly in the code that creates the button.
- You can create a button and pack it at the same time - without
saving the button in a scalar.
- You can change the color of a button after it is created
(with the 'configure' method). To do this you do need
to save the button in a scalar so you can reference it.
For the last enhancement we show how you can query
the button to see what its properties are:
use Tk;
my $mw = MainWindow->new(
-title => "Simple Tk Program",
-background => "red",
);
$mw->minsize(400, 300);
my $button = $mw->Button(
-text => "Push Me! 1",
-bg => "blue",
-command => sub {
print "hello there\n";
},
);
$button->pack;
sub change_color {
#
# what is the text on $button?
#
my $text = $button->cget("-text");
$text =~ s/(\d+)/$1 + 1/e;
#
# what is $button's color?
#
my $color = $button->cget("-bg");
$color = ($color eq "blue")? "yellow": "blue";
$button->configure(
-bg => $color,
-text => $text,
);
}
$mw->Button(
-text => "Color Change",
-bg => "green",
-activebackground => "orange",
-command => \&change_color,
)->pack;
MainLoop;
This is what it will look like after pressing
the "Color Change" button 3 times:
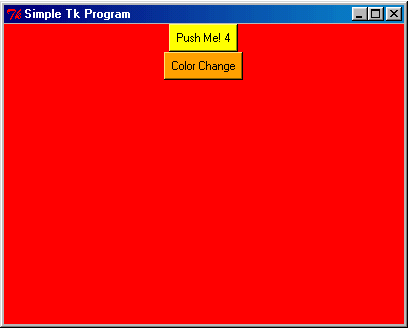
This ends the introduction to Tk. The next topic shows
how you can do drawing in Tk.
Be assured that the Tk graphical toolkit is very rich in function
and can very likely do whatever you want.
Click here
for some more resources on the web (including mailing list archives)
for Perk/Tk.
PrevIndexNext


